Lytics
Step-by-step guide on sending your event data from RudderStack to Lytics.
Lytics is a popular customer data platform built for marketers. It allows you to efficiently leverage your first-party customer data to deliver tailored customer journeys.
RudderStack supports Lytics as a destination to which you can seamlessly send your event data.
Getting started
Before configuring Lytics as a destination in RudderStack, verify if the source platform is supported by Lytics, by referring to the table below:
| Connection Mode | Web | Mobile | Server |
|---|---|---|---|
| Device mode | Supported | - | - |
| Cloud mode | Supported | Supported | Supported |
Once you have confirmed that the source platform supports sending events to Lytics, follow these steps:
- From your RudderStack dashboard, add the source. Then, from the list of destinations, select Lytics.
- Assign a name to your destination and click on Next.
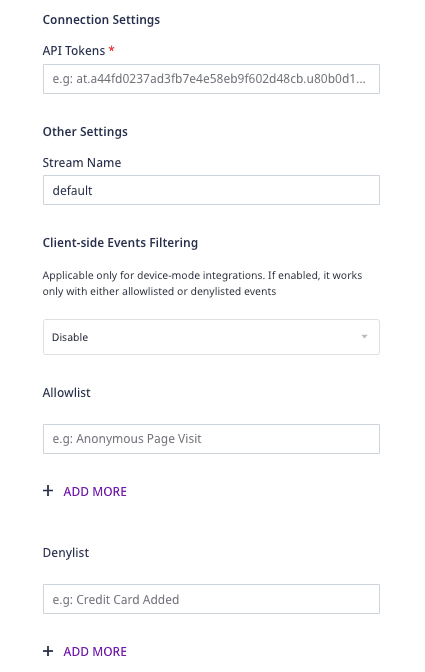
Connection settings
To successfully configure Lytics as a destination, you need to configure the following settings:

- API Token: Create an API token in your Lytics dashboard and enter the details here.
To get the API token, go to your Lytics dashboard and navigate to Account > Account Settings > API Token. You can create an API token here and use this information to configure Lytics as a destination.
- Stream Name: Enter the name of the Lytics stream where you want to send the events.
- Client-side Event Filtering: This setting is applicable only if you are sending events to Lytics via the device mode.
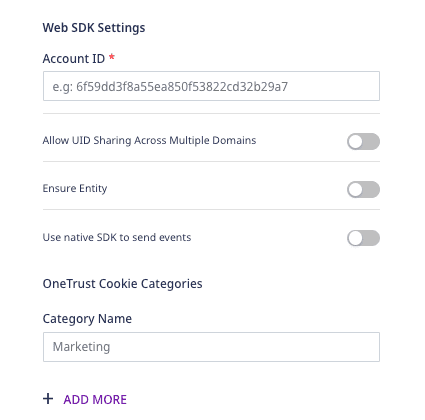
If you are using the JavaScript SDK to send the events to Lytics, enter the following settings:

- Account ID: Enter the the Lytics account ID obtained from your Lytics dashboard. For more information on obtaining the account ID, refer to the Lytics support page. This is a mandatory field.
- Allow UID Sharing Across Multiple Domains: When enabled, this option lets you identify users across domains.
- Ensure Entity: When this option is enabled, RudderStack gets your most updated audience membership and profile data, before sending it to Lytics.
- Use native SDK to send events: Enable this setting if you are sending events via the web device mode.
Identify
The identify call captures the relevant details about the visiting user.
A sample identify payload is as shown in the snippet below:
rudderanalytics.identify("1hKOm4GRlm", { name: "Alex Keener", email: "alex@example.com",})Page
With the page method, RudderStack makes a call to Lytics to record a page view.
A sample page call is as shown:
rudderanalytics.page("Popular", "Bestseller", { url: "https://www.estore.com/search/best-seller/1", path: "/best-seller/1",})Similarly, you can also make screen calls. However, this is supported only in the cloud mode.
A sample screen call is as shown:
[[RSClient sharedInstance] screen:@"Home"];Track
With the track API, RudderStack makes a call to Lytics to track user actions and their associated properties.
A sample track call is as shown:
rudderanalytics.track("Order Completed", { order_id: "1a2b3c4d", category: "category", revenue: 99.9, shipping: 13.99, tax: 20.99, promotion_id: "PROMO_1234",})FAQs
How do I obtain the Lytics API token?
Go to your Lytics dashboard, and navigate to Account > Account Settings > API Token. You can create an API token here, which can be used to configure the destination on the RudderStack dashboard.
For more information, refer to the Lytics documentation.
How do I obtain the Lytics account ID?
To obtain your Lytics account ID, follow these steps:
- Log into your Lytics dashboard.
- Click on the account name on the top right and go to Manage Accounts.
Here, you will see the account ID associated with your Lytics account.
For more information, refer to this Lytics support page.
Contact us
For more information on the topics covered on this page, email us or start a conversation in our Slack community.