ActiveCampaign is a popular marketing automation and CRM platform that makes it easy for you to drive customer engagement and retention. With ActiveCampaign's all-in-one email marketing and growth platform, you can monitor your customers' product behavior and use the resulting insights to design and drive highly personalized customer experiences.
RudderStack supports ActiveCampaign as a destination to which you can seamlessly send your event data.
Getting started
Before configuring your source and destination in RudderStack, verify if the source platform is supported by ActiveCampaign by referring to the following table:
| Connection Mode | Web | Mobile | Server |
|---|---|---|---|
| Device mode | - | - | - |
| Cloud mode | Supported | Supported | Supported |
Once you have confirmed that the source platform supports sending events to ActiveCampaign, follow these steps:
- From your RudderStack dashboard, add the source. Then, from the list of destinations, select ActiveCampaign.
- Assign a name to your destination and click on Next.
Connection settings
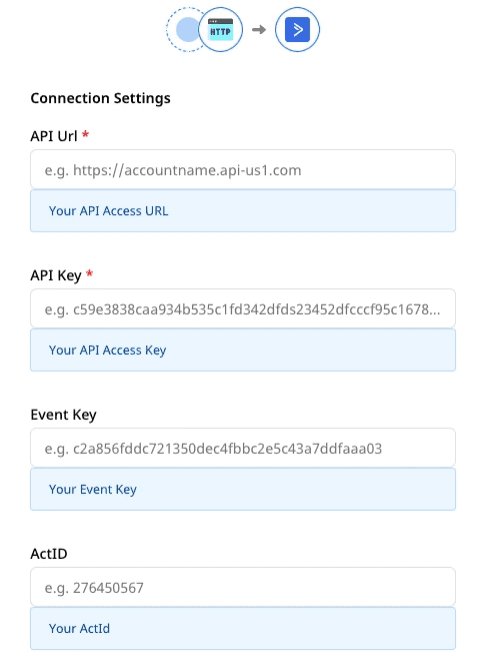
To successfully configure ActiveCampaign as a destination, you will need to configure the following settings:

- API URL: Your API URL is the unique URL generated against your account. It can be found in your account on the Settings page under the Developer tab.
- API Key: Your API key can be found in your account on the Settings page under the Developer tab. Each user in your ActiveCampaign account has their own unique API key.
- Event Key: This value is unique to your ActiveCampaign account. To obtain the event key, go to your ActiveCampaign account and navigate to Settings > Tracking > Event Tracking.
- ActID: This value is unique to your ActiveCampaign account. Go to Settings > Tracking > Event Tracking API. You will find the actid listed here.
Identify
The identify call lets you associate a user with their actions and captures all the relevant traits about them. This information includes unique userid as well as any optional information such as name, email address, etc.
A sample identify call is shown below:
rudderanalytics.identify( "userId", { email: "john@example.com", firstName: "John", lastName: "Keener, phone: "1234567890", })In the above snippet, RudderStack captures relevant information about the user like the userId, as well as the associated traits such as email, phone, and the name (firstName and lastName) of that user.
email trait is a mandatory trait for mapping a user to ActiveCampaign.Custom tags
You can associate a user with custom tags by passing in the tags trait, as shown:
rudderanalytics.identify( "userId", { email: "john@example.com", firstName: "John", lastName: "Keener, phone: "1234567890", tags: ["Returning User", "Coupon Used"], })tags property should contain an array of tags which you want to associate with the user. If any tag is already created in ActiveCampaign previously, RudderStack will automatically skip creating that tag.Custom fields
RudderStack also lets you update a contact’s custom fields in ActiveCampaign.
To send custom fields to ActiveCampaign, you will need to first create the custom fields in ActiveCampaign for each custom field that you want to send. Then, when you call identify with the keys matching those traits, the custom fields for that contact will be automatically updated.
You can use the fieldInfo trait to set values for the custom fields, as shown in the following snippet:
rudderanalytics.identify( "userId", { email: "john@example.com", firstName: "John", lastName: "Keener, phone: "1234567890", tags: ["Returning User", "Coupon Used"], fieldInfo: { Interest: "Electronics", Country: "USA", Hobbies: ["Cricket", "Tennis"], }, })fieldInfo trait contains the value of the custom field that you want to store for that contact. For using this feature, you need to create the custom fields from your ActiveCampaign dashboard \(e.g. - Interest, Country\) before passing the values for the given user."Hobbies": ["Cricket","Tennis"]. Note that for date field, the format should be YYYY-MM-DD. Also, the values for the datetime field should be in a ISO datetime format, i.e. yyyy-MM-dd'T'HH:mm:ss. SSSXXX.List
You can subscribe or unsubscribe a contact from any number of lists by passing in a trait called lists. As shown in the example below, this trait should be an array, with each element having an id and a status. The value of status must be either subscribe or unsubscribe.
rudderanalytics.identify( "userId", { email: "john@example.com", firstName: "John", lastName: "Keener, phone: "1234567890", tags: ["Returning User", "Coupon Used"], fieldInfo: { Interest: "Electronics", Country: "USA", Hobbies: ["Cricket", "Tennis"], }, lists: [{ id: 2, status: "subscribe", }, { id: 3, status: "unsubscribe", }, ], })id parameter for mapping that contact.Page
The page call lets you record information whenever a user sees a web page, along with the associated optional properties of that page. This method must be called at least once per page load.
When you call page, RudderStack will send that event to ActiveCampaign as a site tracking event. This will add your domain to allowlist for tracking purposes.
A sample page call looks like the following:
rudderanalytics.page("home", { path: "path", url: "url", title: "title", search: "search", referrer: "referrer",})In the above sample, RudderStack captures the information related to the page being viewed, the URL property is used to allowlist the website in the destination.
page call will only work if Site Tracking is enabled in ActiveCampaign. You can enable this setting by going to the Tracking tab in your ActiveCampaign settings page.Screen
The screen method lets you record whenever a user sees the mobile screen, along with any associated optional properties. This call is similar to the page call, but is exclusive to your mobile device.
A sample screen call looks like the following code snippet:
[[RSClient sharedInstance] screen:@"Sample Screen Viewed" properties:@{@"prop_key" : @"prop_value"}];In the above snippet, RudderStack captures information related to the screen being viewed, along with any additional information related to the event.
screen event name must contain only alphanumeric characters. ActiveCampaign rejects events with any special characters in the name.Track
The track call lets you capture any user actions and the associated properties. Each action is considered to be an event.
A sample track call looks like the following:
rudderanalytics.track("Product Purchased", { name: "Rubik's Cube",})In the above snippet, RudderStack captures the information related to the Product Purchased event, along with any additional information about that event - in this case the product name.
RudderStack also maps eventData present within the track event properties to ActiveCampaign's eventdata field, as shown:
rudderanalytics.track("Product Purchased", { name: "Rubik's Cube", eventData: "Learn while having fun"})Event name considerations
ActiveCampaign sets certain restrictions in the way you can set your track event names:
- The event name must contain only alphanumeric characters. ActiveCampaign rejects any event containing special characters in the name.
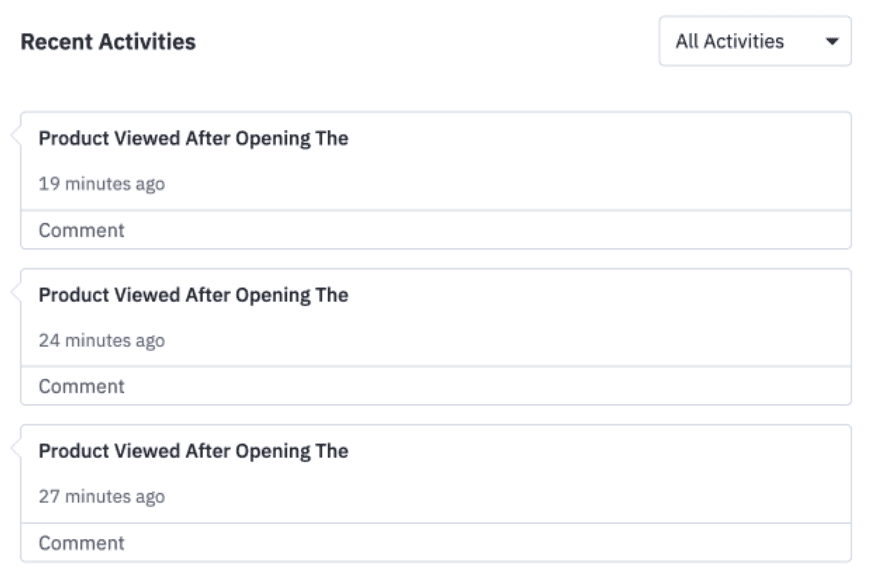
- The event name should not be more than 32 characters. ActiveCampaign automatically truncates event names that are longer than 32 characters. For example, if you send a
trackevent with the nameProduct Viewed After Opening The Browser, ActiveCampaign will automatically truncate it toProduct Viewed After Opening The, as seen below:

FAQ
Can I use special characters in my screen and track event names?
No, your screen and track event names must contain only alphanumeric characters. ActiveCampaign prescribes that the screen and track event names must contain only alphabets and numbers, and does not allow the usage of any special characters.
Contact us
For more information on the topics covered on this page, email us or start a conversation in our Slack community.