Bugsnag
Step-by-step guide to send your app event data from RudderStack to Bugsnag.
Bugsnag provides error reporting libraries for major software platforms which automatically detect and report errors in your applications, and capture diagnostic data required to help you reproduce and fix each error.
RudderStack supports Bugsnag as a destination to which you can seamlessly send your event data.
Getting started
Before configuring Bugsnag as a destination in RudderStack, verify if the source platform is supported by Bugsnag by referring to the table below:
| Connection Mode | Web | Mobile | Server |
|---|---|---|---|
| Device mode | Supported | Supported | - |
| Cloud mode | - | - | - |
Once you have confirmed that the platform supports sending events to Bugsnag, follow these steps:
- From your RudderStack dashboard, add a source. Then, from the list of destinations, select Bugsnag.
- Assign a name to the destination and click on Next.
Connection settings
To successfully configure Bugsnag as a destination, you will need to configure the following settings:

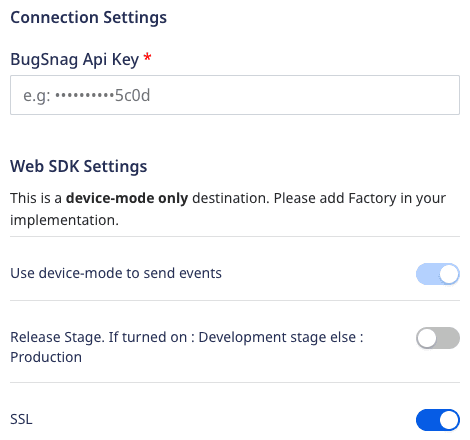
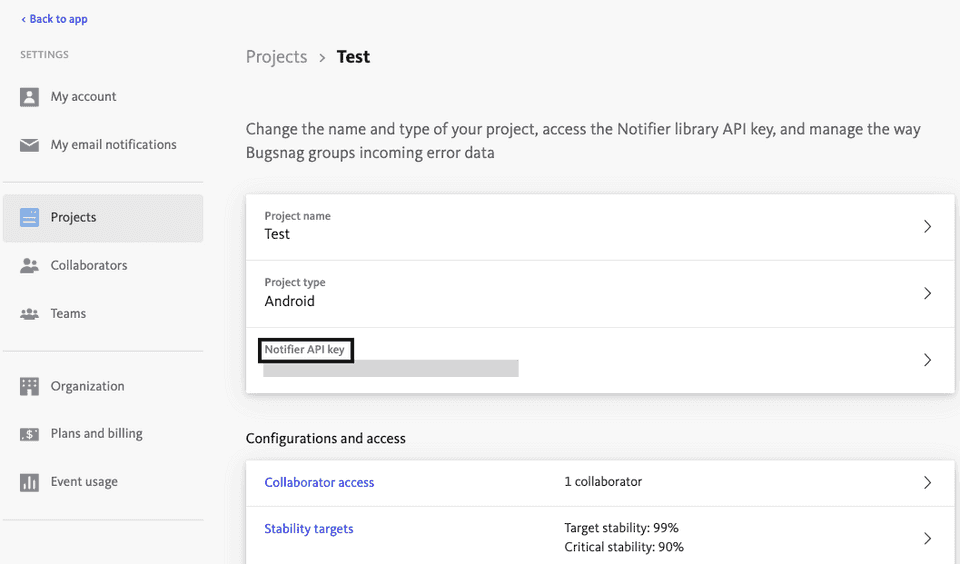
- BugSnag Api Key: Enter your BugSnag API key. You can find the API key in your Bugsnag dashboard under Settings > Project Settings.
For more information on getting your BugSnag Api Key, refer to the FAQ section below.
- Use device-mode to send events: As this is a device mode-only destination, this setting is enabled by default and cannot be disabled.
- Release Stage: Use this setting to specify the release stage of your app:
- Enable it for Development stage.
- Keep it dsabled for Production stage.
- SSL: Enabled by default, this option uses SSL while sending data to Bugsnag.
Adding Bugsnag to mobile project
Once you add Bugsnag as a destination in the RudderStack dashboard, follow these steps to add it to your mobile project depending on your integration platform:
- Add the following
repositoryto yourapp/build.gradlefile.repositories {mavenCentral()} - After that, add the following
dependenciesin the same file:implementation 'com.rudderstack.android.sdk:core:1.0.1-beta.1'implementation 'com.rudderstack.android.integration:bugsnag:0.1.0-beta.1' - Finally, change the initialization of your
RudderClientin yourApplicationclassval rudderClient = RudderClient.getInstance(this,<YOUT_WRITE_KEY>,RudderConfig.Builder().withDataPlaneUrl(<YOUR_DATA_PLANE_URL>).withFactory(BugsnagIntegrationFactory.FACTORY).build())
- Go to
Podfileand add theRudder-Bugsnagextension:pod 'Rudder-Bugsnag', '0.1.0-beta.1' - After adding the dependency followed by
pod install, you can add the imports to yourAppDelegate.mfile as shown:#import "RudderBugsnagFactory.h" - Finally, change the initialization of your
RudderClientas shown:RudderConfigBuilder *builder = [[RudderConfigBuilder alloc] init];[builder withDataPlaneUrl:<YOUR_DATA_PLANE_URL>];[builder withFactory:[RudderBugsnagFactory instance]];[RudderClient getInstance:<YOUR_WRITE_KEY> config:[builder build]];
- Install
RudderBugsnag(available through CocoaPods) by adding the following line to yourPodfile:pod 'RudderBugsnag', '~> 1.0.0' - Run the
pod installcommand. - Then, import the SDK depending on your preferred platform:import RudderBugsnag@import RudderBugsnag;
- Next, add the imports to your
AppDelegatefile under thedidFinishLaunchingWithOptionsmethod, as shown:let config: RSConfig = RSConfig(writeKey: WRITE_KEY).dataPlaneURL(DATA_PLANE_URL)RSClient.sharedInstance().configure(with: config)RSClient.sharedInstance().addDestination(RudderBugsnagDestination())RSConfig *config = [[RSConfig alloc] initWithWriteKey:WRITE_KEY];[config dataPlaneURL:DATA_PLANE_URL];[[RSClient sharedInstance] configureWith:config];[[RSClient sharedInstance] addDestination:[[RudderBugsnagDestination alloc] init]];
Identify
The identify method lets you identify a user and associate them to their actions. It also lets you record any traits about them like their name, email, etc.
A sample identify call is shown below:
rudderanalytics.identify("1hKOmRA4el9Zt1WSfVJIVo4GRlm", { name: "Alex Keener", email: "alex@example.com",});Bugsnag will show the userId and traits in the Users tab of each error.
Error Reporting
Along with user-specific information, you can also use Bugsnag to track handled exceptions data to your dashboard using Bugsnag's native methods. For more information on these functions, refer to Bugsnag documentation.
FAQ
Where can I find the Bugsnag API Key?
- Log into your Bugsnag dashboard.
- Click on Settings at the top right corner.
- Click on Project Settings to find the API key as shown:

What is meant by Release Stage?
You can distinguish errors that happen in different stages of your app's release process, for example, production, development, etc.
Do I need to use SSL?
You should use SSL while sending data to Bugsnag in web device mode.
Contact us
For more information on the topics covered on this page, email us or start a conversation in our Slack community.