Delighted
Step-by-step guide on sending your event data from RudderStack to Delighted.
Delighted is a popular customer feedback platform. It allows your teams to gather instant, invaluable, and actionable customer feedback to improve your processes and product.
RudderStack supports Delighted as a destination to which you can seamlessly send your customer data.
Getting started
Before configuring your source and destination in RudderStack, verify if the source platform is supported by Delighted by referring to the table below:
| Connection Mode | Web | Mobile | Server |
|---|---|---|---|
| Device mode | - | - | - |
| Cloud mode | Supported | Supported | Supported |
Once you have confirmed that the source supports sending events to Delighted, follow these steps:
- From your RudderStack dashboard, add the source. From the list of destinations, select Delighted.
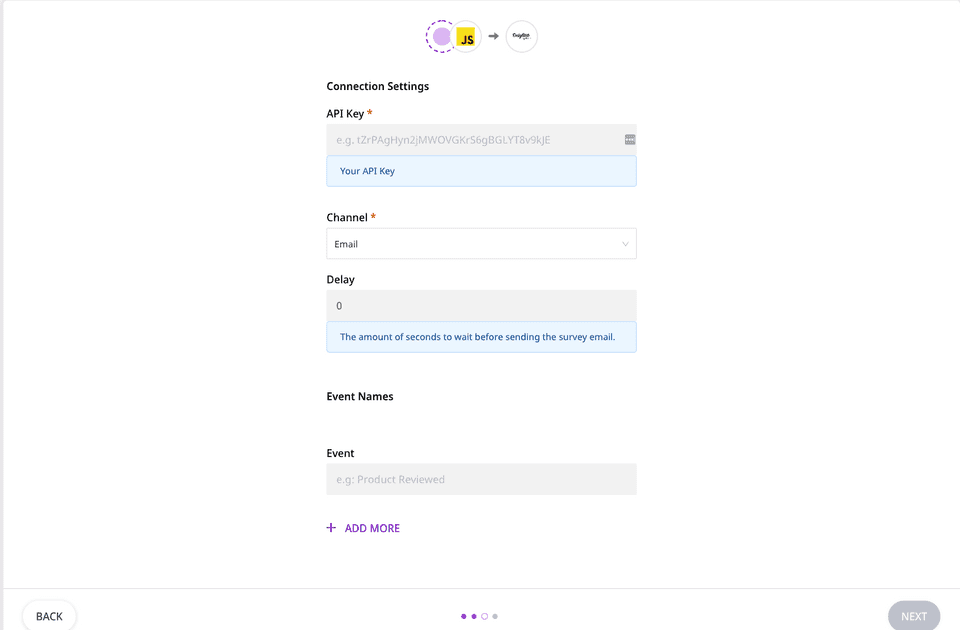
- Give a name to the destination and click on Next. You should then see the following screen:
 Delighted Connection Settings
- Enter your Delighted API Key.
For more information on how to get your Delighted API key, refer to the Delighted docs.
- By default, the channel is set to Email. You can also select SMS from the dropdown.
- Set the Delay value (in seconds) here. By default it is set to 0.
- To make a
trackcall, enter the Event Names for whichtrackcall will be triggered.
If the RudderStack dashboard does not contain the Event for which the track call is triggered, RudderStack will throw an error.
- Finally, click on Next. Delighted will now be enabled as a destination in Rudderstack.
Identify
The identify call lets you to add a user to your People List. If the user already exists, RudderStack will update the user with the latest information. This includes userId as well as other additional properties related to user like name,phone number/email, channel, and the 'Last sent at' timestamp.
- The
userIdprovided during the call must match the Channel type. The channel type can be either set from Rudderstack dashboard or you can send it via theidentifycall with the parameterDelightedChannelType.
The channel type set via the identify call will get a higher precedence.
- You can provide the user email or phone number. Both are not required at the same time, since one of the values will be set from the
userId. - You can also send the
last_sent_atvalue with the call. Refer to the example below for more details.
Last sent at (in UNIX timestamp) is used to manually set the time a person was most recently sent a survey. This value will be used in the Delighted **Survey throttling** system, which ensures that same person won’t be surveyed more than once per month.To change its value manually, go the Delighted dashboard, select your Project from top left corner and click on the settings icon beside Project Name.
A sample identify call is as shown below:
rudderanalytics.identify("name@surname.com", { name: "User", last_sent_at: "1624293839", phone_number: "+1234567890"}, { externalId: [ { type: "delightedChannelType", id: "sms" } ]}});In this example, since the userId is already an email, you can provide the user's phone_number as well. Also, the delightedChannelType will override the Channel Type set in the RudderStack dashboard.
Except userId, all the other fields in the call are optional.
Track
The track call lets you send the survey to the user added to the People List in your account. In addition to name, phone number/email,channel, and the 'Last sent at' timestamp, you can also add as many custom properties as you need.
If the user does not exist, you cannot make a track call. You need to first add the user in the People list via the identify call.
The Delay value from the dashboard will override the value sent via the track call.
A sample track call is as shown below:
rudderanalytics.track("Test", { delighted_email_subject: "Custom Email Subject.", customProperty: "Custom Value", customProperty2: "Custom Value2"}, { externalId: [ { type: "delightedChannelType", id: "sms" } ]}});In the above example, Test is the event name. Except the event name, all other fields are optional.
If you do not enter the Event name in the dashboard for which the track call is triggered, RudderStack will throw an error.
Delighted also provides some custom properties by itself. In the above example, delighted_email_subject sets the email subject of the survey to Custom Email Subject. Note that this change can be done from the Delighted website too.
Some other default properties provided by Delighted are mentioned in the table below:
| Delighted Property | Description |
|---|---|
question_product_name | Delighted shows this question in the survey. |
delighted_intro_message | Delighted displays this message in the email subject. |
locale | This property determines the localization (including language) of the survey experience. |
For more default properties, check out this Delighted support page.
In the example shown above, customProperty is the custom property field that you can set. Note that you must provide values for these custom fields, or else they will be dropped by Delighted.
Alias
The alias call allows you to update the user's email or phone number. You need to set previousId as the current value and userId as the updated value.
The previousId and userId must be of the same type, i.e., either email or phone number.
A sample alias call is as shown below:
rudderanalytics.alias("new@email.com", "old@email.com")Both previousId and userId are required.
Contact us
For more information on the topics covered on this page, email us or start a conversation in our Slack community.