Sentry
Step-by-step guide on sending your event data from RudderStack to Sentry.
Sentry is a popular error monitoring and reporting tool. It is open source and enables you to monitor and track real-time errors and crashes in your app.
RudderStack supports Sentry as a destination to which you can send your event data directly.
Getting started
Before configuring Sentry as a destination in RudderStack, verify if Sentry supports the source platform you are sending the events from by referring to the following table:
| Connection Mode | Web | Mobile | Server |
|---|---|---|---|
| Device mode | Supported | - | - |
| Cloud mode | - | - | - |
Once you have confirmed that the source platform supports sending events to Sentry, follow these steps:
- From your RudderStack dashboard, add the source. Then, select Sentry from the list of destinations.
- Assign a name to the destination and click on Next. You will then see the following screen:
 Configuration Settings for Sentry
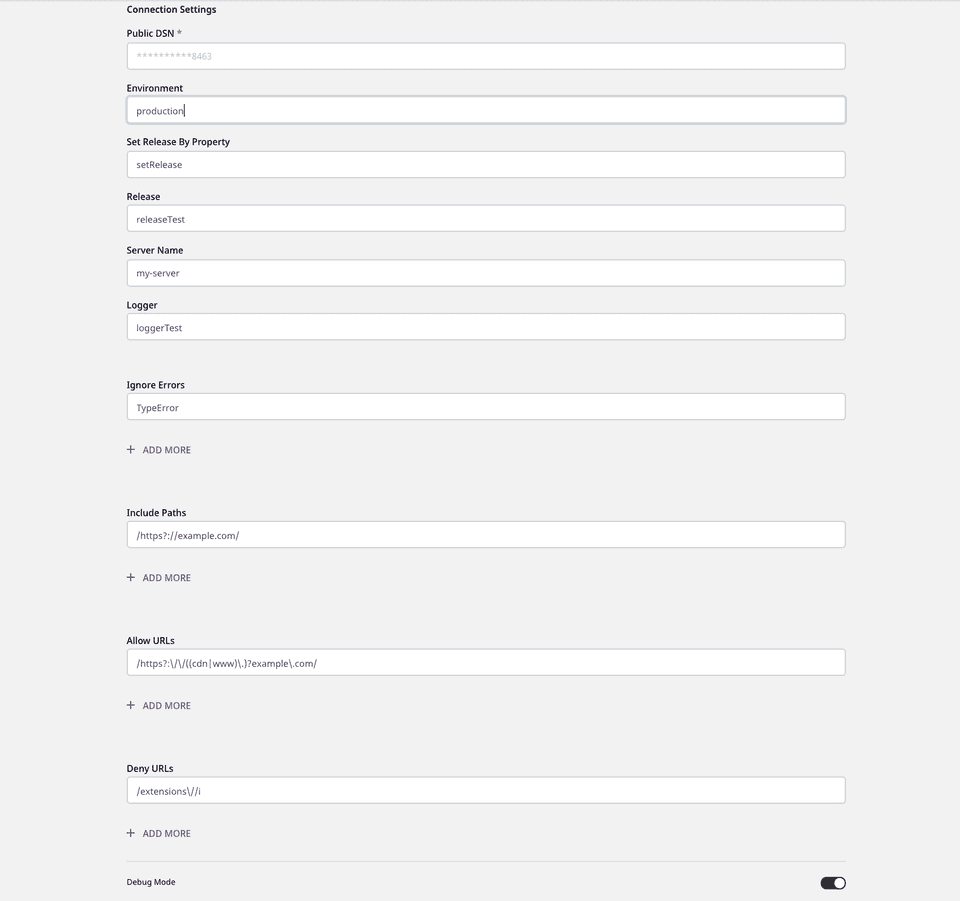
Connection Settings
To successfully configure Sentry as a destination, configure the following settings:
- Public DSN: Enter the public DSN of your Sentry project here. This is a mandatory field.
Refer to the FAQ section below for more information on getting your public DSN.
- Environment: Enter the value you want RudderStack to set as the environment configuration in your Sentry dashboard. For more information on the use of environments in Sentry, refer to their documentation.
If you enter the value for the Environment field as a forward slash (/), new line character, space ( ), or the string None, Sentry will silently discard the environment configuration information without sending any error.
- Set Release By Property: This field helps you dynamically track the application version in Sentry. The property set here will be searched in the global window object. If found, RudderStack will use that particular version. Otherwise, the value set in the Release field will be used by default.
Suppose you have set the Set Release By Property field to the value new_custom_version and RudderStack finds window.new_custom_version=2.4.5 in the window object. In this case, RudderStack will send the value 2.4.5 as the app version to Sentry. Otherwise, it will look for the value input in the Release field and send it as the app version.
Sentry needs the release value for every single session. If neither Set Release By Property or Release fields are specified in the dashboard while configuring the destination, the particular session will be discarded.
- Release: This field is used for tracking your application's version in Sentry.
- Server Name: This option is used to track the host on which the client is running. You can enter the server name or even the Device ID in this field.
- Logger: The name you want Sentry to use as logger. For more information on Sentry's logging feature, refer to their docs.
- Ignore Errors: This option refers to a list of error messages that you do not want Sentry to notify you. You can enter this list as a string or a regular expression.
- Include Paths: This field should contain the regex patterns of URLs that are part of the app in the stack trace. The other frames will appear as collapsed in the Sentry dashboard.
- Allow URLs: This is the list of the regex patterns or exact URL strings - from which the errors need to be exclusively sent to Sentry. The URLs of the actual JavaScript files should match this list.
- Deny URLs: This field refers to the list of regex patterns or exact URL strings for which the errors need to be ignored.
- Debug Mode: In debug mode, no events are sent to your Sentry instance. You can set this option to true or false to enable or disable this feature. By default, it is set to false.
A sample configuration looks like the following:

Identify
When an identify call is made, RudderStack calls Sentry.setUser by passing the user traits.
RudderStack discards the identify call if none of the userId, userName, email, or ip_address is present. Atleast one of these four fields is needed to capture the user information. For more information, refer to the Sentry documentation.
RudderStack maps userId to id while setting the user in Sentry.
A sample identify call is as shown:
rudderanalytics.identify("userid", { name: "Name", email: "name@website.com",});FAQ
How do I get the public DSN of my Sentry Project?
To get your public DSN, follow these steps:
- Log into your Sentry account.
- In the left navigation bar, go to Projects .
- Click on the right-most settings icon. This will open the settings window.
- Click on Client Keys (DSN) under SDK Setup.
- Copy the DSN and use it in your RudderStack destination configuration.
Contact us
For more information on the topics covered on this page, email us or start a conversation in our Slack community.