Google BigQuery
Step-by-step guide to ingest your data from Google BigQuery into RudderStack.
Google BigQuery is an industry-leading, fully-managed cloud data warehouse that lets you store and analyze petabytes of data in no time.
RudderStack supports Google BigQuery as a source from which you can ingest data and route it to your desired downstream destinations.
Granting permissions
RudderStack requires you to grant certain user permissions on your BigQuery warehouse to successfully access data from it.
Perform the following steps in the exact order to grant these permissions:
Step 1: Creating a role and granting permissions
- Go to the Roles section of Google Cloud Platform dashboard and click on CREATE ROLE.
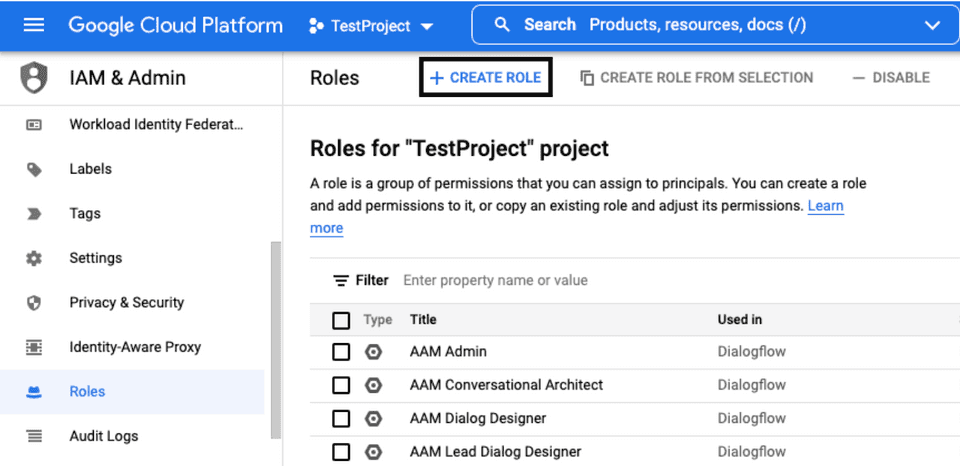
- Fill in the details as shown:
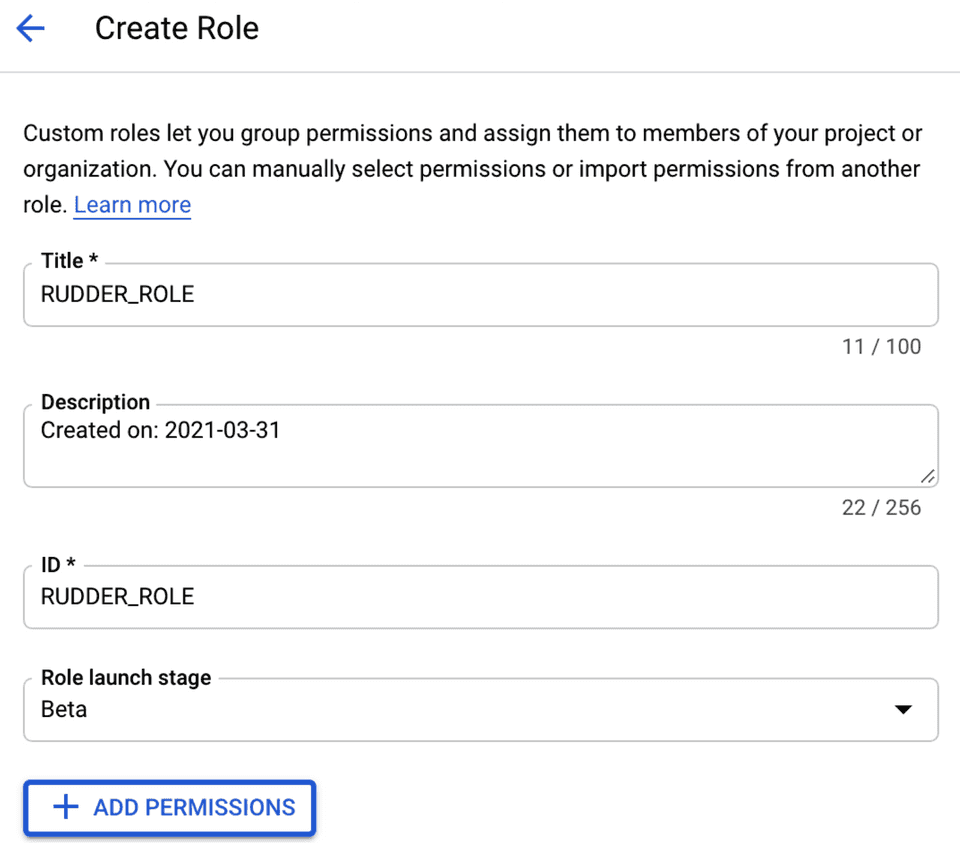
- Click on ADD PERMISSIONS and add the following permissions:
bigquery.datasets.getbigquery.jobs.createbigquery.jobs.listbigquery.tables.createbigquery.tables.getbigquery.tables.getDatabigquery.tables.listbigquery.tables.updatebigquery.tables.updateData- Finally, click on CREATE.
Step 2: Creating a service account and attaching the role to it
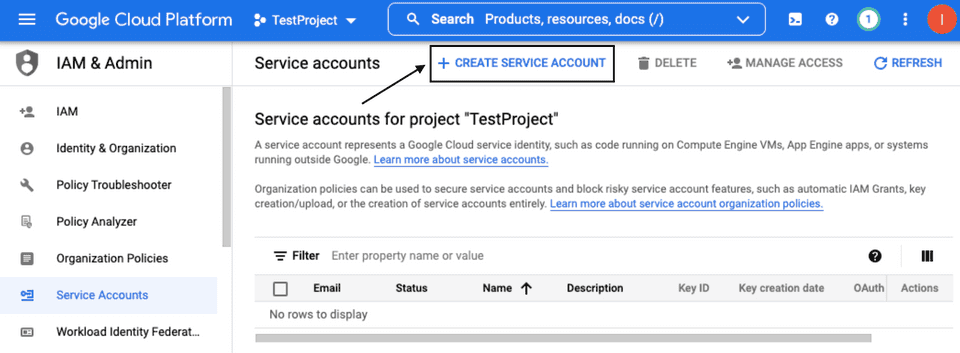
- Go to Service Accounts and select the project which has the dataset or the table that you want to use.
- Click on CREATE SERVICE ACCOUNT.
- Fill in the Service Account details as shown below, and click on CREATE AND CONTINUE:
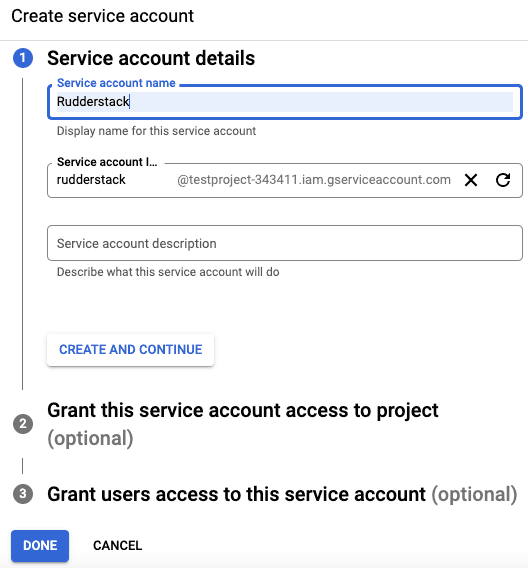
Note down the Service account ID. This ID is required while creating the RudderStack schema and granting the required permissions to it.
- Fill in the Role details as shown below, and click on CONTINUE:
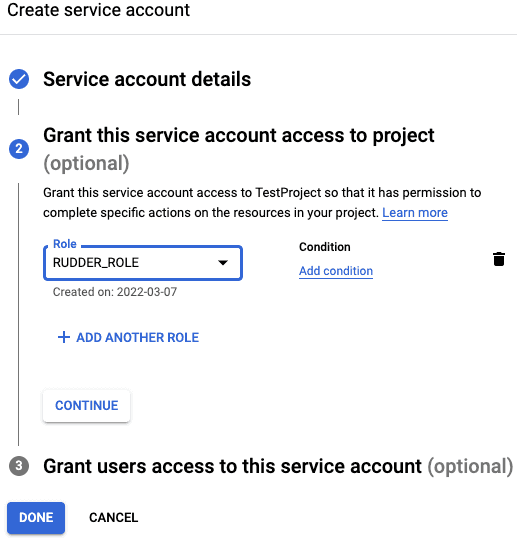
- Click on DONE to move to the list of service accounts.
Step 3: Creating and downloading the JSON key
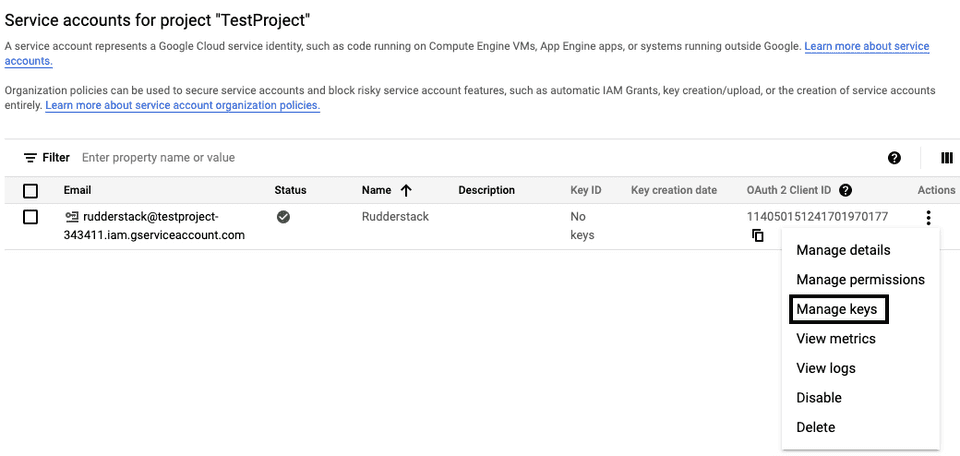
- Click on the three dots icon under Actions in the service account that you just created and select Manage keys, as shown:
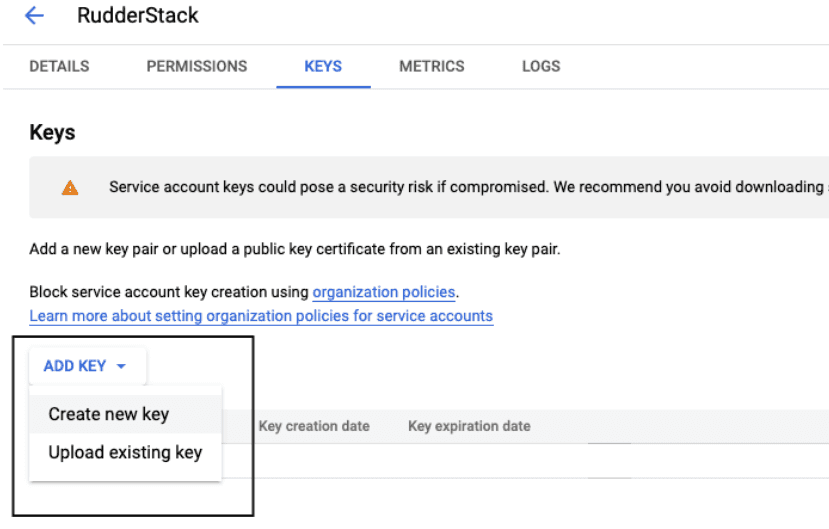
- Click on ADD KEY, followed by Create new key, as shown:
- Select JSON and click on CREATE.
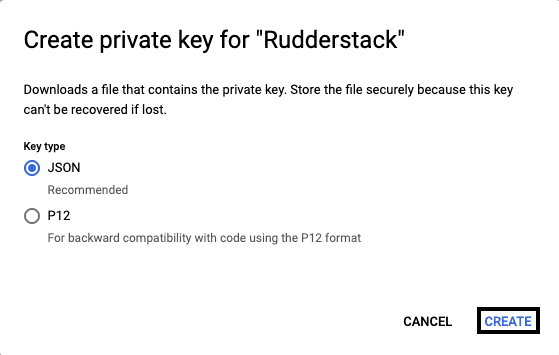
A JSON file will be downloaded on your system. This file is required while creating a BigQuery warehouse source in RudderStack, explained further in this document.
Step 4: Creating the RudderStack schema and granting permissions
- From your BigQuery SQL workspace, run the following command to create a dedicated schema
rudderstack_.
create schema rudderstack_;The rudderstack_ schema is used by RudderStack for storing the state of each data sync. This name should not be changed.
- Grant full access to the
rudderstack_schema for the RudderStack service account you created above. Replace<SERVICE_ACCOUNT_ID>with the service account ID you specified in Step 2: Creating a service account and attaching role to it.
GRANT `roles/bigquery.dataOwner` ON SCHEMA rudderstack_ TO "serviceAccount:<SERVICE_ACCOUNT_ID>";Setting up the BigQuery source in RudderStack
To set up BigQuery as a source in RudderStack, follow these steps:
Naming the source
- Log into your RudderStack dashboard.
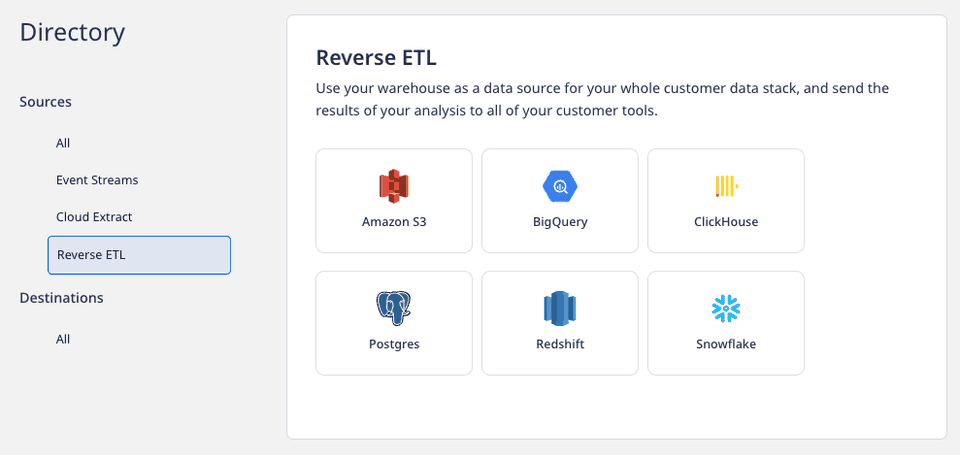
- From the left navigation bar, go to Source > New Source > Reverse ETL. Then, select BigQuery, as shown:
- Assign a name to your source.
Configuring the connection credentials
- Choose the relevant option from Table or Model to use the source to sync data from either a warehouse table or a model.
For more information on the difference between the Table and Model options when creating a Reverse ETL source, refer to the FAQ section below.
- Enter the relevant settings in the Connection Credentials section as listed below:
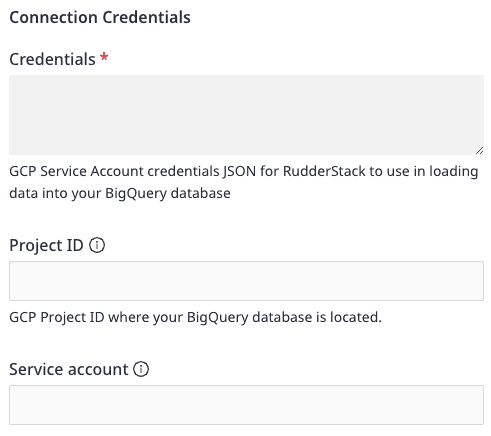
- Credentials - Enter the GCP Service Account credentials JSON.
- Project ID - Enter the
project_idfrom the GCP Service Account credentials JSON. - Service account - Enter the
client_emailfrom the GCP Service Account credentials JSON.
If you've configured BigQuery as a source before, you can select the existing credentials under the Use existing credentials option.
- Click on Continue to verify your credentials. RudderStack will then verify and validate your credentials.
For more information on these validation steps, refer to the FAQ section.
- Once verified, click on Continue to proceed.
Schedule settings
- Specify the Schedule Settings to schedule the data syncs from your BigQuery instance.
RudderStack lets you schedule data syncs for your Reverse ETL sources and specify how and when the syncs will run. For more information on the Basic, CRON, and Manual schedule types, refer to the Sync Schedule Settings guide.
- After specifying the schedule type and run settings, click on Continue to finish the setup.
BigQuery is now successfully configured as a source in your RudderStack dashboard. You can further connect this source to your preferred destination by clicking on Add Destination button, as shown:

Specifying the data to import
While connecting a destination to your Reverse ETL source, you can use the default JSON mapping or the Visual Data Mapping feature.
Based on the option(Table/Model) you chose while setting up the Reverse ETL source, follow the relevant guide for detailed steps:
FAQ
What is the difference between the Table and Model options when creating a Reverse ETL source?
When creating a new Reverse ETL source, you are presented with the following two options from which RudderStack will sync the data:
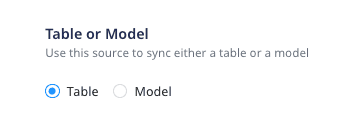
- When you choose Table, RudderStack imports all the data associated with the specified table during the sync.
- When you choose Model, RudderStack imports the data by running the query specified in the connected model, during the sync.
What do the three validations under Verifying Credentials imply?
When setting up a Reverse ETL source, once you proceed after entering the connection credentials, you will see the following three validations under the Verifying Credentials option:
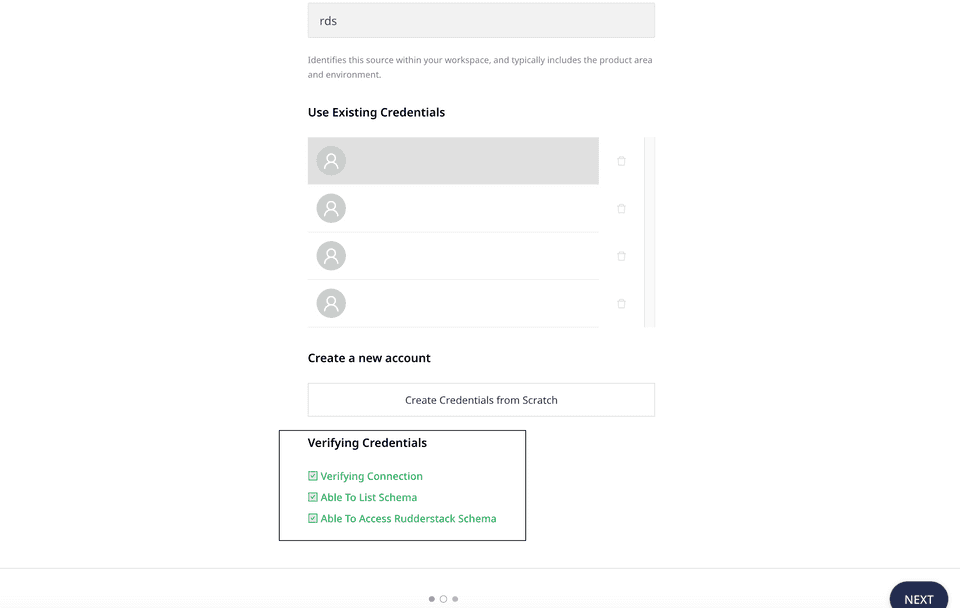
These options are explained below:
- Verifying Connection: This option indicates that RudderStack is trying to connect to the warehouse with the information specified in the connection credentials.
If this option gives an error, it means that one or more fields specified in the connection credentials are incorrect. Verify your credentials in this case.
- Able to List Schema: This option checks if RudderStack is able to fetch all the schema details using the provided credentials.
- Able to Access RudderStack Schema: This option implies that RudderStack is able to access the
rudderstack_schema that you have created by successfully running all the commands in the Creating the RudderStack schema and granting permissions section.
If this option gives an error, verify if you have successfully created the rudderstack_ schema and given RudderStack the required permissions to access it. For more information, refer to Creating the RudderStack schema and granting permissions section.
Contact us
For more information on the topics covered on this page, email us or start a conversation in our Slack community.